


Hellllo readers! I hope everyone is enjoying Spring and the beautiful weather. I haven't much time to do my DIY projects because I've been trying to get out of the house as much as possible. That, and I haven't been as inspired from Pinterest as I usually am. UNTIL NOW.
Meet this wonderful creation: DIY WALL ART

You see, there's this large empty space behind my dresser that needs some attention. Right now it's so bare and I've been wondering what to put there. A mirror? Hanging jewelry box? Art?
Then I found this DIY project and knew it was calling my name. I love everything about it-it's chevron, it's colorful, it's just the right size...
So I went to Michaels and bought a canvas and some Acrylic paints (in teal hues of course to match the bedroom decor)! I already had painter's tape, 1" wide, to use to create the design on the canvas.

Next, I marked the canvas to the spacing I wanted and laid out the tape in parallel lines.

The hard part was getting the chevron/herring bone pattern. It took me a couple tries and lots of measuring! I finally got it down.

It's not perfect by any means, but I still love the look!
The next step, I took metallic gold spray paint and sprayed over the canvas. I didn't cover it, making sure there were plenty of white spots to fill in with other colors. Then I just kept adding paint until I had used all the colors I wanted on the canvas. I had no particular order or method, just kept painting!

I left that dry over night and then started peeling off the painters tape. There were a few places where the tape had started coming up and a little paint got underneath, but I wasn't too worried about it! Here's the final product!

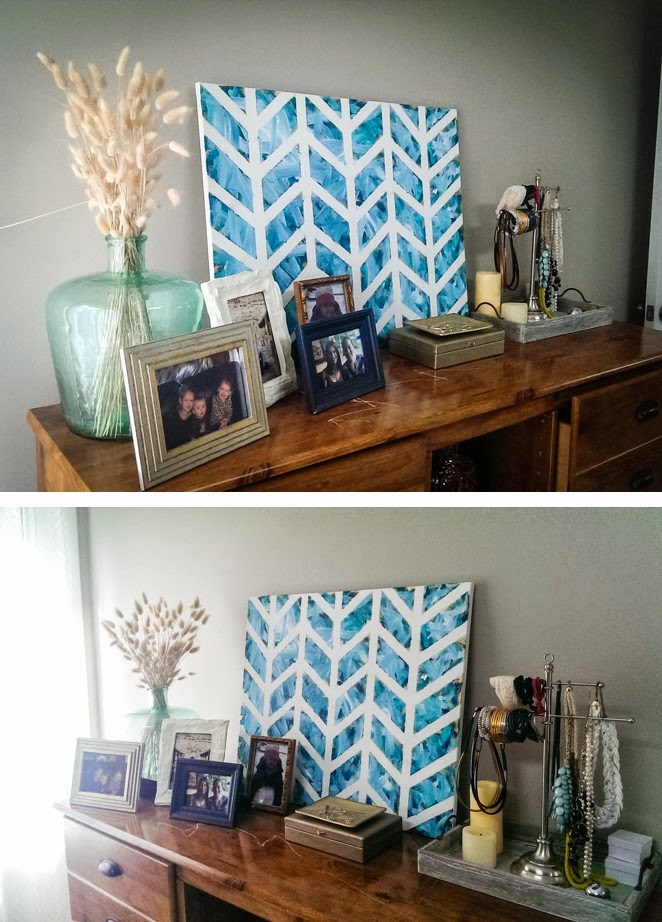
So after all that work I had to put it up. We're renting, so I decided not to hang it. I set it on top of the dresser instead, which I love! Here is the BEFORE (ignore our dresser, I'm going to refinish it with a whitish paint, so it's on the list of DIY projects!):

And here's the AFTER:
What do you all think? Did I do it justice?

I'm excited to have it in our bedroom finally. It was a super easy way to spruce up the place! I think I might have an even easier project for next time. I just found it today, so I'll be back in June with that project! :)
Gabby
I love this! It's beautiful. I definitely am going to have to try this out this weekend. Thanks for sharing!
ReplyDeleteThanks so much! Gabby did a great job. Would love to see pictures if you make one! So glad you stopped by :)
ReplyDeleteLove this DIY project! It looks so great on your dresser! :)
ReplyDelete